One could argue, "You can't do it without insulation." And it's true - if you choose to spend your nights on the road in a hammock, know that you can't do without good insulation for most of the year. If you're in your early twenties, you may be able to take the cold much better, but that doesn't mean that youthful indiscretion won't catch up with you one day in the form of a houser when a light breeze blows, for example. The most important thing that makes sleeping in a hammock comfortable is achieving thermal comfort. In a hammock you need to rest after many kilometres and you certainly don't want to be woken up in the middle of the night by the cold.
Many thanks to Infrastellar and also to Lesovik for providing the photos.
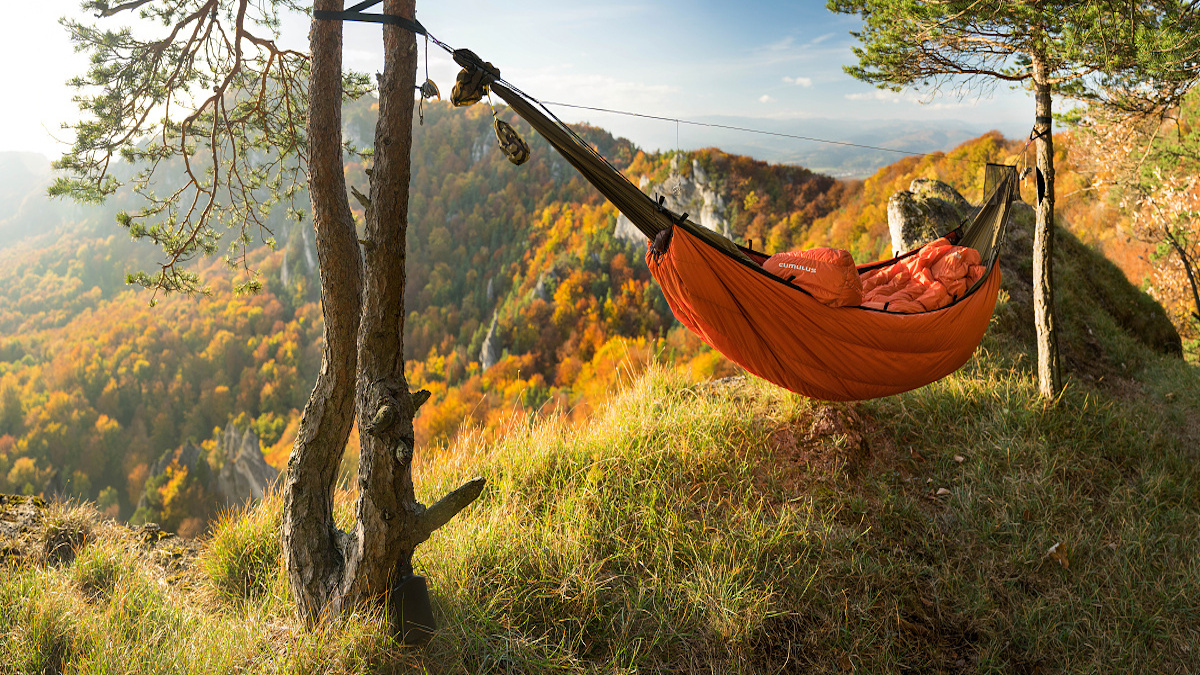
Lower insulation, underquilt, uq… WTF?

After the question “Which hammock should I buy?” “What kind of insulation will I need?” There is no simple answer here either. Every time someone asks me a question like this, I feel like Socrates, who is credited with the famous statement “I only know that I know nothing”.
The bottom insulation of a hammock, which you will encounter in the Anglo-Saxon world under the name underquilt, abbreviated UQ, is nothing more than thermal insulation that prevents body heat from escaping out into the colder world around. In shape and size, underfloor insulation resembles the classic duvet you have at home for sleeping. Only you don’t put it over yourself, but instead have to hang it under the hammock you sleep in. You can also imagine the whole thing as half of a sleeping bag, should you decide to split the sleeping bag in half lengthwise.
In the photo below you can see the insulation from the Polish manufacturer Lesovik, specifically their flagship summer down version Otul Air (weight 350 g, filled with the highest quality Polish goose feathers, fill rate 700 cuin, dimensions 190 x 110 cm, designed for temperatures from 7 °C and above), which was developed in cooperation with another Polish company Pajak. For someone looking for an ultralight set for bikepacking, this is an excellent choice with, for example, a DUCH or SUL hammock from the same manufacturer. The Otul Air / SUL combination is around 600 g (including ridgeline and suspension). And that’s already a very interesting weight.

Of course, Lesovik also offers cheaper versions of insulation, but these rely on hollow fibre insulation. Specifically, the Otul Light insulation (weight 400 g, CLIMASHIELD Apex hollow fibre, dimensions 200 x 100 cm, designed for a temperature range of 7 °C / 10 °C and above) and the Otul winter version (weight 820 g, CLIMASHIELD Apex 4.0 hollow fibre, dimensions 200 x 140 cm, designed for a temperature range of +10 °C / -7 °C). You can see the winter and summer versions in the following photos.


Cold butt syndrome

You may still think that if you take a sleeping bag or topquilt, you won’t need underfloor insulation. But that’s a big misconception that novice hammock travellers don’t realise at first. Using bottom insulation fundamentally eliminates one of the major negatives of sleeping in a hammock. Your body’s weight is exerted on the hammock material, which completely copies you at the main pressure points. This is good for your stability, but not a bit for thermal comfort. Whatever you put between you and the hammock and it can’t withstand the pressure of your body is mercilessly compressed. If such a thing is a sleeping bag, the back of it will lose its ability to insulate you from the cold of the environment due to compression. Now remember, functional insulation is not something that will actively keep you warm. What actually warms you is the waste heat generated by your body through ongoing thermoregulation. Insulation merely prevents this heat from escaping into the environment. Without underneath insulation, you will gradually get cold from the lowest point of your body. Do you know what that point is? 😊 Exactly. The tricky thing about crawling from this point is that it happens slowly and gradually, and it doesn’t take long for you to realize something is wrong.
However, it is also true that no thermal insulation is all-sufficient. Thermal comfort is influenced by several parameters. It depends on how you dress for the night, what sleeping bag or topquilt you use, whether you exercise before going to bed and what you eat before going to bed. How you tolerate the cold is also important, as is the place you choose to sleep. Getting everything right will mean experimentation, which you can’t avoid. But the following few tips may help you a little.
Eat, drink, exercise, think!

Bivouac site
Choose your sleeping place well. In general, it is a good idea to avoid sleeping on mountain ridges and hills at all costs in the beginning. You may miss out on some great views, but on the ridges you can get really bad weather in the form of strong winds and storms compared to lower elevations. When you’re more experienced, you can try such extremes , but first it’s important to figure out how everything works. On really cold nights, it’s best not to sleep too close to large water sources or at the bottom of cold gullies. You will only increase the demands on your thermal comfort considerably. The ideal place to spend the night should be well sheltered, dry and in a lee. Take advantage of natural obstacles and if you are in the hills, try to bivouac about halfway up the slope. A well-chosen spot means a few degrees better comfort and thus less demands not only on your equipment.

Food
Eat well before lying down in the hammock. The food will automatically kick-start your metabolism. In addition to digestion, your body will start to produce waste heat, which you can put to great use if you insulate it well. It’s just like the combustion engine and heater in a car, distributing excess heat to the interior. Focus on foods that you digest slowly. Forget the sports bars, but eat junk food from today’s perspective and enjoy it. You need eggs, camembert, meat, chocolate, potatoes, corn and who knows what else. A dense diet will warm you up much more easily. Even if you maybe watch your line, you can survive a few times a year. If you’re an active enough person, then you won’t have a problem with it. I’m sure vegetarians or vegans will find something too. It’s just made me hungry now.

Workout
Don’t forget to exercise before going to bed as well. A few squats will warm you up reliably and quickly. Don’t be shy about it. Sometimes it’s funny to watch someone in front of a tent or hammock, what that person is doing…
Clothes for the night
Always change your clothes before you go to sleep. Do not use man-made fibres or cotton! The skin fat that your body expels during the night will stick to the surface of the synthetic fibres and pass through the hammock into the insulation. Cotton, on the other hand, will absorb water very slowly. Merino wool clothing, on the other hand, is very suitable. Wool can draw fat into itself and hold it. The wrong clothing will usually make your insulation look several years old after two months of use. Beware, this also applies to your sleeping bag or topquilt. Remember, damp clothing that you’ve covered dozens of miles in will suck the heat out of you at night.
Hydration
Make a good tea and drink at least 300 ml before bedtime. It’s another important thing to get your thermoregulation up. The body will react to a warm drink by cooling down and start generating waste heat. Also try to pee just before you go to bed.

Hot water for the hammock?
In the colder months of the year, you can also brew tea before going to bed, pour it into a bottle and then insulate it with, for example, a sock. Then put the bottle between your thighs. The insulation means you won’t burn and the thermal bridge ensures that the heat is gradually transferred to your legs. Thanks to the tea used, you also get a drink for the night. This is especially good in harsh winters, because what is not in the sleeping bag freezes and you need to drink at night and in the morning. But not every material is suitable for storing hot drinks. Nalgene bottles have been proven for a long time. By the way, a drink bottle in your sleeping bag is one of the best tips for cold feet syndrome, which is often a problem when bivouacking, not only in the hammock. If that’s not enough, slipping a sleeping pad (bib) into your sleeping bag or topquilt will also help. Ideally, place it flat and then place the ends of your legs on this additional insulation. This is excellent protection against wind passing through the hammock. You will have to experiment with the water bottle. I myself have had the misfortune of pouring boiling water into a bottle, dropping the bottle between my legs and falling asleep quite quickly, only to get hyperthermia. I literally overheated. I felt faint and sick and had to cool down quickly. Since it was the first time this had happened to me, it also took me quite a while to realize what was happening. So always be careful with experiments like this.
Weather
Try to find out in advance what the weather will be like and always allow for possible deterioration of the situation just in case. Ideally, learn to read the weather without necessarily having to rely on various apps. Observe the world around you. When travelling in our mild conditions, experience will be enough. To this end, I recommend the very nice book Nature on the Trail by Peter Wohlleben.

We could certainly find more recommendations, but the point is that everyone has to figure out what works for them. It is not always necessary to combine all these recommendations together, but to choose the appropriate one based on your own experience and the actual natural conditions.
How thick to choose the thermal insulation?

Remember that from temperatures of 20 °C / 68 °F and below, it is important to always use base insulation when sleeping in a hammock. What layer of insulation you need depends primarily on the outside temperature during the night combined with your current physical condition – see the recommended advice above. And precisely because determining thermal comfort and achieving it is not a simple matter, the best manufacturers offer their insulation in variations for different seasons, graded according to temperature ranges. Other manufacturers allow you to choose from several top material options and offer you fillings in the form of goose or duck down of different fillings. In this way they can solve the requirements for thermal comfort while keeping the weight to a minimum and the packability satisfactory. Such manufacturers include American cottage companies such as Warbonnet Outdoors, Jacks R Better, Cedar Ridge Outdoors. Of course, there are many more good manufacturers overseas, but it’s worse when buying in the EU (unfortunately, this is still the case with HammockGear). In Europe, unfortunately, good manufacturers are still scarce. Among the proven and quality brands, besides the already mentioned Lesovik, there is also the Polish Cumulus. For example, their insulation has one specialty in the form of a collar, as you know it from sleeping bags and some topquilts, where it prevents heat from escaping around the neck. In the underquilt, this collar, on the other hand, prevents heat from escaping at the ends of the insulation. By the way, one of the pioneers of hammocking in Slovakia, who was also at the birth of the first insulation from this brand, is behind the introduction of this feature in Cumulus. In the photos below, you can see the first unpublished shots of the then first production version of the winter insulation set and also the winter prototype (the prototype is in a snowy landscape).


And as a bonus, you can also take a look at the not-yet-produced colour versions of Cumulus insulation made from Pertex Endurance.

To mention the more affordable manufacturers, we have the very popular DD Hammock. This manufacturer currently offers insulation for only one temperature range under the label DD Underblanket (weight 970 g including eight carabiners, with compression wrapping 1062 g, microfiber 200 g / m², dimensions 200 x 124 cm, designed up to -5 °C), relying on the sides to attach to the hammock with carabiner loops. In the following photos you can see it including the attachment details. The insulation is therefore suitable for someone who doesn’t seek out pronounced hard freezes and doesn’t mind a bit more weight.


To get an idea of what you can get from other manufacturers, we can look at the Wookie insulation from Colorado’s Warbonnet Outdoors. This manufacturer offers the Wookie in Standard (for Blackbird Traveler hammocks) and XL (for Blackbird XLC, Eldorado, Traveler XL hammocks) versions. The Wookie can be used on asymmetrical and symmetrical hammocks without any problems, even from other manufacturers. However, it is always necessary to know the length of the hammock and choose accordingly. For longer hammocks, the Mini Sling can be used, which extends the length of the suspension of the insulation.


It is important to choose the right oriented version according to your laterality. Wookie insulation is atypical in that the insulation part is oriented diagonally. For this reason, the manufacturer produces the insulation in the classic configuration where the head is on the left and the feet on the right. A reversible version, where it is possible to have one insulation for both directions (change by turning the reverse/leaves), also exists. I recommend reading the previous part, where I explain in detail the difference between an asymmetrical and symmetrical hammock, and I also address the issue of diagonal lying there.
The Wookie insulations are filled with goose down in 850 or 950 cuin fill. The weights given below refer to the 950 cuin filling. All values below are calculated for 20D Nylon material with a hydrophobic treatment (DWR = durable water repellent).
The 20 °F (-6 °C) version has a total weight of 460 g (16.23 oz) and the 50 °F (10 °C) summer version as low as 300 g (10.60 oz). However, the Wookiee can also be ordered for temperature comfort -30 °C (-20 °F) in the Scandinavian version. The weight of this last variant is an incredible 700 g (24.71 oz). The down filling itself weighs 483 g (17.04 oz). This extreme version of the insulation is therefore significantly lighter than similar hollow fibre products that are designed for much lower temperature ranges. In the picture below you can see the Wookiee for a comfort temperature of 0 °F (-17 °C) weighing 544 g (19.17 oz).
 ve váze 544 g (19.17 oz) / foto: Infrastellar")


You can choose the following comfort temperatures for Wookiee insulation:
- 10 °C (50 °F)
- 5 °C (40 °F)
- 30 °F (-1 °C)
- 20 °F (-6 °C)
- 10 °F (-12 °C)
- 0 °F (-17 °C)
- -20 °F (-30 °C) – Scandinavian.
Based on these examples of insulation, we can now define at least a basic rule of thumb that can help you choose the right insulation for specific temperatures.
- 70 °F (20 °C) and above – No insulation is needed.
- 30-70 °F (0-20 °C) – Choose one of the 3-season insulations.
- 0-30 °F (- 20-0 °C) – Select one of the winter insulations.
- -40-0 °F (-40- -20 °C) – Select any of the extreme winter insulations.
Please take these ranges with a grain of salt, as everything is complicated by how sensitive you are to cold, i.e. whether or not you are a cold sleeper. For those of you who are more sensitive to the cold, you’ll want to choose insulation one range warmer. The ranges above refer to nighttime temperatures.
When tuning the optimal equipment for a specific temperature, not only hammockers are used to various gadgets that help you solve seemingly unsolvable situations. One of the most commonly applied is layering insulation. Let’s say you need to sleep at -10 °C (14 °F), but you only have one -1 °C (30 °F) and one -6 °C (20 °F) of insulation at home, for example. In this case, hang both insulations under the hammock. By the way, we apply the same rule to top insulation – typically sleeping bags or topquilts, which we also layer. If you ever go to very extreme temperatures in the -40-0°F (-40- -20°C) range, then be sure to bring an extra layer of VBL (VAPOR BARRIER LAYER) to put in your topquilts or sleeping bag as a first layer, not counting merino underwear and t-shirt. 😊 This is an almost impermeable fabric that needs to be kept as close to the body as possible. The purpose of this layer is to achieve closure of your sweat glands, as in the winter VBL can keep a layer of steam generated by the body close to the body to ensure optimal skin moisture. This is important in the winter because your body then doesn’t need to produce additional sweat, thus not losing water unnecessarily. You are thus not prematurely dehydrated and exhausted. As a rule of thumb, the colder it gets, the better VBL will work. Using VBL also helps reduce the amount of insulation layers required!

We now know that the main purpose of insulation is to prevent the heat produced by your own body from escaping for long enough so that you don’t feel cold, so that your body has time to balance everything out and you don’t get overly dehydrated. That’s also why we already know that an insulating layer doesn’t heat, it insulates. And we also know what underquilt is. Don’t believe the delusions that you won’t need insulation and don’t play the hero, as I often encounter. Again, the goal is to rest and recharge for the next day and function. At the last bikepacking gathering held at Plesivec, I had the chattering of some travelers’ teeth in addition to the morning birds. And that time the temperature dropped to only 3 °C. If you’ve already made the decision to get an underquilt for your hammock, then I recommend taking into account a few other parameters before buying, which we’ll talk a little about now.
Down or synthetic?

The type of insulation filling is a determining parameter when selecting an underquilt. Think carefully about the type of insulation filling you choose. Currently, you can choose from pure animal insulation (goose or duck down) or synthetic insulation (hollow fibres). A lot will depend on your personal preferences as to which you opt for.
Down
It is a traditional insulating material, tested by nature itself during the evolution of the bird kingdom. Feather insulation is lighter than synthetic insulation. However, this difference has been gradually blurred in recent times with the advent of different variants of APEX hollow fibre, which in a sense can simulate the behaviour of traditional feathers. Nevertheless, feathers still offer the best warmth-to-weight ratio. It also still retains the better packability that is often crucial for bikepacking. As an example, a 3-season down underquilt can be packed into an 8-liter drybag and still include a first aid kit, overnight clothes (merino jersey, long t-shirt, hat, wool socks) and last time I added two dried lunches. But feathers also have their drawbacks. It must not get wet, because then it offers absolutely no insulating value until it dries well again. Manufacturers try to prevent this negative by having the feathers hydroformed before stuffing. Nylon 10D or 20D with a DWR treatment is often used as the cover packing material. Another negative is the purchase price. In general, the purchase of quality down insulation is an expensive affair. A large increase in price is seen for fillings from 800 cuin and up. It is also worth mentioning the fact that customers tend to prefer goose down insulation, especially because goose down is odourless, whereas duck down can smell in certain situations. However, few people know that goose is much more prone to soiling and also sheds more. Now, baba, advise. Fortunately, with a quality certified manufacturer you will be assured that the goose or duck feather filling will be of sufficient quality and you may not even notice these differences.
Cuin is a unit of feather fill and is an industry standard that determines relatively accurately how high quality the feathers used are. That is, how much 28.4g (1 ounce) of feather volume occupies the space of one cubic inch. The higher the quality of the feather, the more volume it will occupy and therefore the higher the cuin value. A larger occupied volume then means that the down insulation will be fluffier (have more air around it – technically loft).
If low weight, good collapsibility and a higher price are the determining parameters for you, then down insulation will be the best possible choice for you.

Synthetics
Synthetic fibres, on the other hand, are made from wound polyester fibres that are designed to mimic the insulating properties of feathers. The main advantages are that synthetic insulation insulates even when wet. This is quite a difference from down. Another good feature is the higher resistance to soiling. With synthetic insulation, you don’t have to worry so much about dirt. The last advantage is affordability. Often, for the price of one good quality down insulation, you can get three synthetic insulations. Unfortunately, synthetics don’t perform nearly as well in terms of weight savings and packability. As an example, I can again mention the 8 litre dry bag, which can hold one 3-season synthetic insulation, but hardly anything else. At least that is my personal experience. In addition, too much compression degrades synthetic insulation, and very quickly. The hollow fibre breaks through, which deprives the synthetic insulation of its properties guaranteed by the manufacturer. If you drive a lot (20+ times a year), synthetics will retain their defined properties for around two to three years. Currently still the best synthetics CLIMASHIELD Apex maybe some extra year. Expect your comfort temperature to then drop by about a third of the original declared values and more over time. On the other hand, quality down insulation will last for up to 20 years without significant loss if treated carefully, provided you store and care for it properly.

If moisture resistance, less susceptibility to contamination and a significantly lower price are the determining parameters for you, then synthetic insulation will be the best possible choice for you.

It is surprising how much the public still holds the view that a insulation pad is suitable insulation for a hammock. The truth is that twenty years ago the development of underquilt insulation was in its infancy. And the most logical option was to carry over the habits of sleeping on the ground. But sleeping in a hammock, whether you want to or not, is a completely different world. It’s almost impossible to survive the night with a mattress embedded in a hammock so that it stays in place. And if you ever do, you are very limited in your movement while sleeping. Shifting the hammock underneath you while you sleep just because you want to lie more diagonally than you did a moment ago is an almost superhuman task that can drive a person out of the hammock and start rearranging everything Plus, it’s always preferable to use a double-layer hammock with a car mattress because you put it between the layers and that makes it a bit more stable. So, in my opinion, a good quality underquilt clearly leads the way. With a quality underquilt you will also save weight underneath, because a single layer hammock will be enough. Such a hammock will also cost you less money. Still, hammock manufacturers are slow to give up. The latest such outcry is hybrid inflatable mattresses with added down filling. Such representatives include mattresses from Warmlite, but their price is astronomical, ranging between $300-$400 depending on the model.

Variants of uq suspension system
Most manufacturers use more or less similar methods of hanging insulation, but there are some differences. Remember that with most insulation you will see a suspension that consists of either just one primary suspension or a combination of primary and secondary suspensions. The difference is that the primary suspension is mainly used for lifting towards the hammock. This is very important. This is the only way to achieve a minimum air gap between the hammock and the insulation. The closer the insulation is to the hammock, the less heat loss you will have. However, in combination with secondary suspension you can stretch the insulation better in length. Primary suspension is used for example by Bushmen Glow or the Lesovik Otul shown below. On the other hand, a combination of primary and secondary suspension can be found, for example, in the Phoenix insulation from HammockGear. With both options, be prepared for the insulation to take some time to position correctly.

An interesting suspension can be found in the Wookie from Warbonnet. This insulation is specific in that it looks like it has been sewn into another hammock. Or as if you just want to hang an extra hammock. That’s also why you don’t need to use a flexible shockcord anywhere, but instead have the suspension at the head solved with just a loop that you pull over the end of the hammock. On the leg side, on the other hand, you have a rubber loop with a locking carabiner. It’s a simple and very quick solution. This insulation also lacks the air hole tightening at the ends of the insulation compared to all the others, because it is not needed. Either way, something different will suit everyone. And it is certainly not true that one solution should be worse or better than another, as all solutions are established standards.


The Big Show
And here we are again at the end, and since you often ask how it is possible to pack such a circus on a bike, I am attaching one photo from my mobile phone.
- Handlebar drybag (8 l): Topquilt and down jacket.
- Handlebar bar bag “bread bag”: meatier provisions. Mostly meat and beer for the evening, veggies, cheese… and I’m hungry again.
- Forked drybag (3.5L): Hammock, mosquito net, tarp, complete rigging, hammock light.
- Frame bag: complete cooking kit, pegs for tarp, pump, cycling tool, knife, wood saw, powerbank, bike lock…
- Two handlebar bags + another frame bag: chopsticks, toilet scoop, toilet paper, bananas, apple, cell phone, knives and cutters, spoon, fork, cards…
Under saddle drybag (8 l): sleeping pad, underquilt, overdress for the night, first aid kit and those two dried lunches.
I take more in winter. So just swap the handlebar and under-saddle drybag for the 16-litre versions – and I hereby thank ACEPAC from the bottom of my heart for coming up with something as fancy as handlebar and under-saddle harnesses.

I’m still thinking about what should be in the next episode. Maybe it will be about topquilts, hammock suspension systems or tarps…
Discussion